-->
Last year as our family was preparing to move from Galena to
Unalakleet, we decided it did not make financial sense to ship our beloved 1997
extended cab F-150 out to the coast as it would not fit on a freight plane and
shipping by barge was cost prohibitive.
So, we began shopping for a vehicle that met the less than 17’ long
requirement of Everts Air Cargo.
We located
a 2008 Ford, 6-cylinder, 4-wheel-drive Escape located in Fairbanks. An F-150 it is not, but it would be enough to
launch our small river boat and should handle the snow and ice of Unalakleet
winters okay. Our college-aged daughter
agreed to take it for a test ride and I gave her a list of things to look out
for. One of those things was any noise
in the front-end.
Upon test
driving it, my daughter noted and pointed out a front-end noise to the
seller.
“Oh, that
is just road noise…” the seller claimed.
I was
skeptical, but the car met our needs… it was four-wheel drive, would fit on a
plane, etc. We moved forward with the
purchase knowing that something would have to be done to the front-end.
Fast
forward through a year of driving with a very noticeable, very not road noise
clatter coming from the driver’s side front wheel. It was definitely the sound of a faulty CV
joint, but as a public-school administrator responsible for sports on the
weekend, extra time was not something I had a lot of. It would have to hold and did until I could
get to it.
I ordered a
CV joint from Rock Auto and then waited for a comfortable day (not blowing 20
mph, not freezing, relatively bug free).
The replacement was pretty straight forward.
 |
| 2008 Ford Escape 6-cylinder, 4-wheel-drive |
I parked
the car on a mostly flat spot, assured it was in park, set the brake, blocked
the wheels and loosened the lugs on the wheel.
An Escape is a unibody car and so it has some very specific jacking
points. According to the owner’s manual,
this is below the bolt that attaches the control arm to the body reinforcement
under the car. I jacked the car and
placed a jack stand below the body reinforcement (I have a major fear of having
a car fall on me after watching the family minivan hop off a jack in my dad’s
garage as a kid).
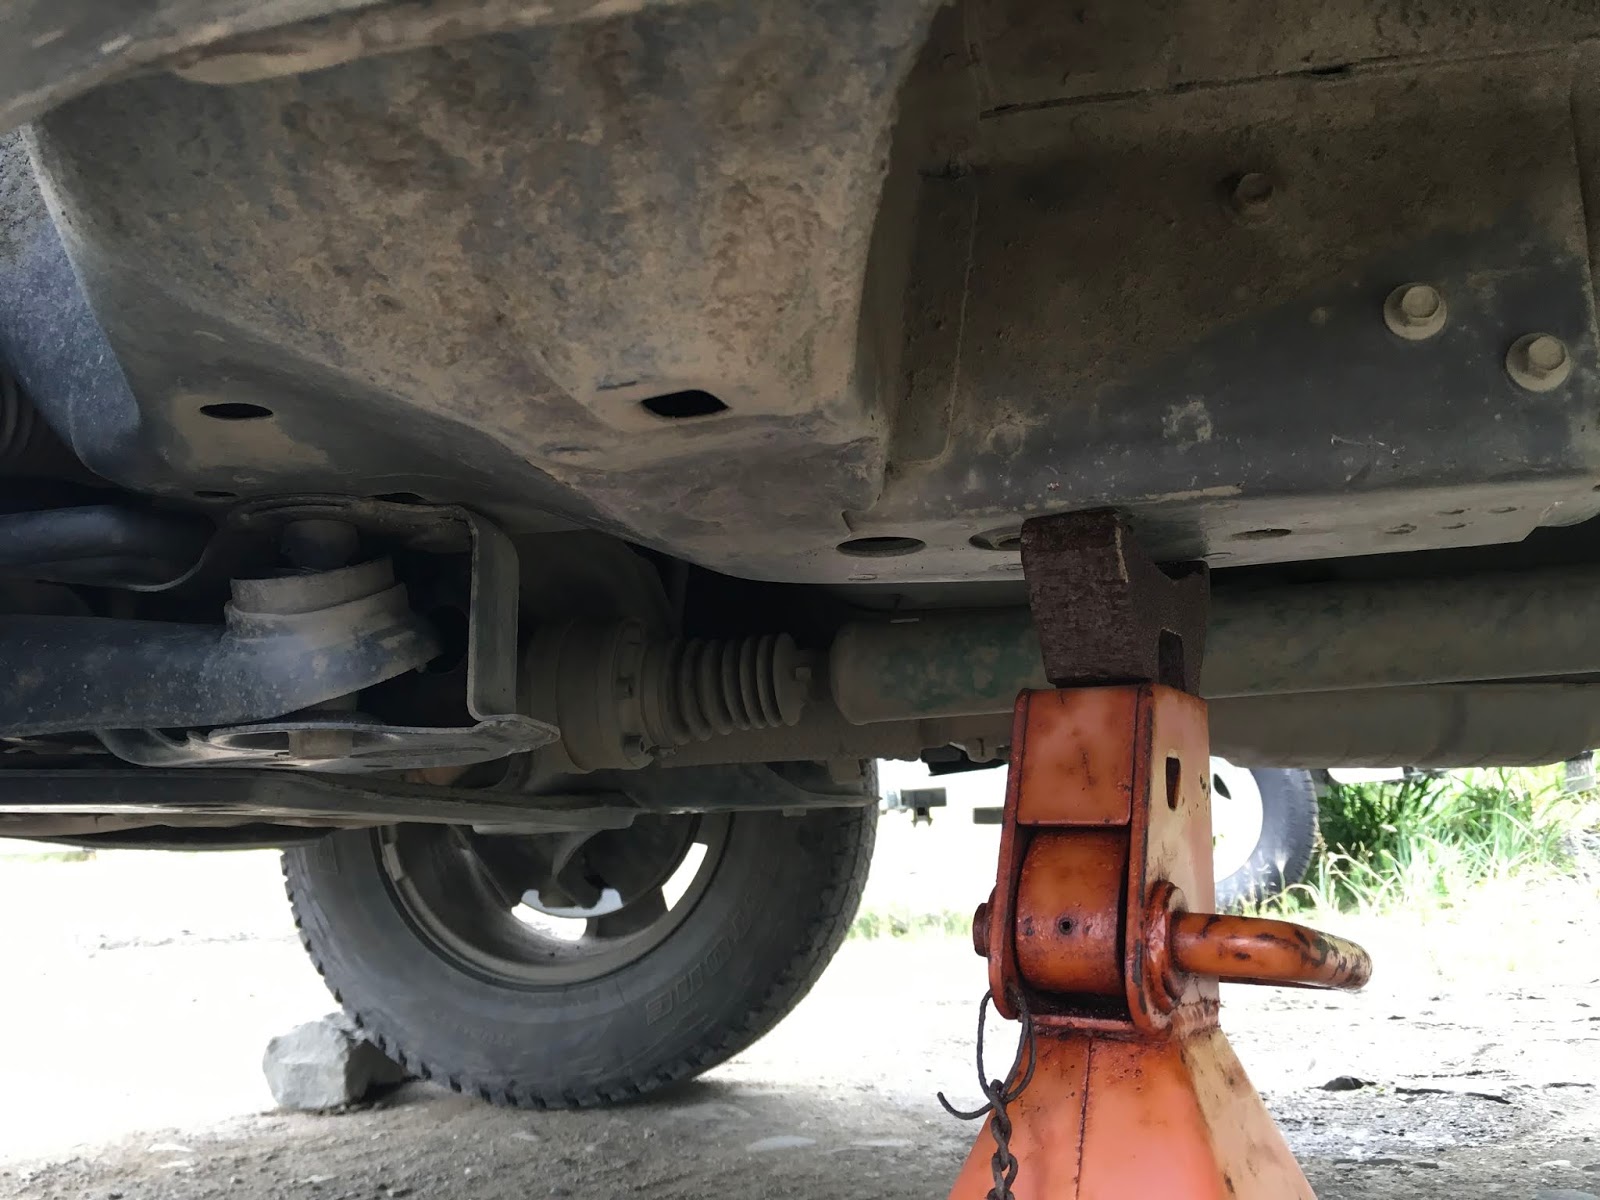 |
| Jack stand under body reinforcement |
With the
car on the jack stand, I pulled the front wheel. I am not sure if I really needed it, but I
blasted each fastener that was going to be removed with a healthy dose of WD-40
just to make removal easier.
The brake
caliper came off first by removing the two 18mm bolts (I am a little sad that I
own a Ford that requires the use of metric sockets… I believe my F-150 was all
standards). I had a duck decoy sitting
on the porch (doesn’t everyone) that I cut the decoy line off of and looped the
line around part of the caliper and up around a coil of suspension spring. It is not wise to leave the caliper suspended
from the brake line, and this also got the part up out of the way.
 |
| Top Caliper bolt can be seen in the center. The bottom bolt is straight down from it and the same size. |
 |
| A little decoy weight line was enough to suspend the brake and caliper from the suspension spring. |
Following
the caliper, the shock tower is disconnected from the hub assembly. It is attached through another two 18mm
bolts, but these have nuts holding them and so require a wrench on both
sides. Since these were blasted by WD-40
earlier, they came free with a light grunt and then some wiggling to relieve
tension on the assembly.
The outer
tie end must be removed from the assembly in order to allow enough freedom of
movement for the old CV joint to slide out as well as the new to slide in upon
reassembly. Again, this is an 18mm, but
requires a deep well socket to access the nut.
Once the nut is free, a firm tap against the housing where it is
attached to the wheel will loosen it enough to give a careful tap to the end of
fastener itself. I realize that the use
of hammer and careful seems oxymoronic, but I didn’t want to distort the
fastener making it impossible to put back together. It is my understanding that there are pullers
available at parts stores for this job, but considering I had a tough time
finding WD-40 at the two stores in Unalakleet, I didn’t bother asking about a
puller.
The wheel
nut comes off next, and since I have an electric impact, I did not bother to
break it free on the ground before pulling the tire off and jacking the car
up. I was surprised to find that there
was no cotter pin holding a castle nut, but it was more of a nut with an
integrated washer… it kept the wheel on for the first 80,000 miles, I guess
it’ll have to do until I have to pull it apart again (the new CV joint came
with a new nut). Hopefully that won’t be
for quite a few more pothole filled miles.
There is a
sensor attached to the wheel assembly that I was not going to take off, but
found was necessary when trying to force the CV joint out of the hub. The wire would not allow enough freedom of
movement and so it had to come off too.
In moving from Galena to Unalakleet, I honestly don’t know where my
socket set is with the tiny sockets and so I can’t quote a size for this one
that held the sensor in. I grabbed ahold
of it with a pair of vise grips (one size fits all) and removed the bolt that
way. This is probably not the time or
place for a rant about sensors and idiot lights, and so I’ll refrain. Let’s just say my first thought was to cut
it, but it came out and went back in just fine.
At this
point, the old CV joint is ready to remove and some pressure applied with just
my hands and some wiggling on the lower control arm allowed me to pretty easily
push the CV joint free. I was feeling
pretty cocky. I had been dreading this
job for about a year as I walked by the part stacked in our entry corner
multiple times a day. But… here I was a
couple of minutes from having the old one out and ready to put the new one in. I placed a drain pan under the transmission
and CV joint in case any transmission fluid should leak out.


I have
relatively large hands and there is really nothing relatively large in an
Escape. I have looked at newer ones
under the hood, and it is only getting more crowded in there. With this in mind, it was difficult for me to
get both hands on the CV joint where it enters the transmission. It is pretty much held in place by a little
clip (look at your new replacement if you are doing this job), and should just
take a good popping tug to bring free.
There is not much room in there to place a large screw driver and so I
grabbed as close as I could to the transmission and pulled. It was at this point that the little voice in
my head that often shows up sometime during a project spoke up.
“What if
you can’t get the old one out?”
I grabbed
the end of the CV joint… don’t do this if you are doing this same job, and I
gave a firm tug. Something gave, but it
wasn’t the CV joint coming out of the transmission. The boot closest to the transmission
stretched out and something inside of it stretched with it. Whatever it was was not willing to go back
the way it came and the little voice spoke up again.
“Huh…”
The point
of no return. I found a space to place a
large flathead screw driver between the transmission and the CV joint where the
two join, did some careful popping motions with the screw driver, did some
wiggling pulling with my free hand, and the old joint came free. It is my understanding, now that the job is
done, that there is a special tool that can help with this job. It is a type of fork that slides over the
joint between the CV joint and the transmission and is then struck with a
hammer. Evidently, it is not necessary.
Everything
goes back together in reverse order. I
was extremely careful to keep the two ends of the CV joint clean as not to
introduce any foreign matter to the works.
The new joint enters the transmission and is pushed firmly into place. A gentle tug assures that the clip is doing
its job.
 |
| New CV Joint in Place |
The only
hiccup that may arise in putting everything back together is the break caliper
plunger being extended and not allowing the brakes to slide over the
rotor. I had this happen while replacing
the hub assemblies on our 97 F-150. I
used a C-clamp to press the plunger back in and it allowed me to slide the
caliper back on. I did not have that
problem this time, but if someone can learn from difficulties I have had, all
the better.
After getting
everything back together, a quick test drive confirmed that the rattle, at
least that rattle, was gone. My ears are
convinced that something else is rattling in there now, but thankfully not as
pronounced… maybe the other side?
No comments:
Post a Comment